How to Use Baryonyx Robot Trading MT4 Setting ?
A lot of traders think buying a Forex robot is the hard part. In reality, the bigger problem starts after installation. The Expert Advisor (EA) gets attached to the chart, the panel opens, dozens of settings appear, and many users either leave everything on default or begin changing random values they do not fully understand. That is where performance usually breaks down.
Baryonyx Robot Trading MT4 is a good example of why settings matter. At first glance, the panel looks simple enough, but once you read through the options, you realize this is not a robot you should run blindly. It includes controls for lot sizing, money management, profit handling, trade frequency, spread behavior, trailing logic, and order execution style. That means the results you get can change a lot depending on how you configure it.
This review is focused on what really matters: the settings panel, what the visible values mean, and how traders can use them more intelligently in 2026.
➡️ Telegram Support: Join for updates, announcements, and support
Why EA Settings Matter More Than EA Marketing
Most traders do not lose because a robot is “bad.” They lose because they treat every bot like a plug-and-play machine. That almost never works for long.
A trading robot may perform one way on a small account with fixed lots, another way on a larger account using money management, and a completely different way when spread widens, when trade frequency increases, or when exits are handled differently. The same EA can feel conservative in one setup and reckless in another.
That is why a real Baryonyx Robot Trading MT4 setting review should go deeper than saying “good” or “bad.” The real question is:
How is the robot configured to trade?
When you understand that, you can make better decisions about:
-
Risk per trade
-
Lot scaling
-
Drawdown control
-
How often trades can open
-
Whether exits are fixed or dynamic
-
Whether the setup suits a small or large account
With Baryonyx, several visible values suggest that risk control and execution behavior deserve close attention before going live.
📩 Free Support & Setup Help – Contact us 👉 Telegram Support
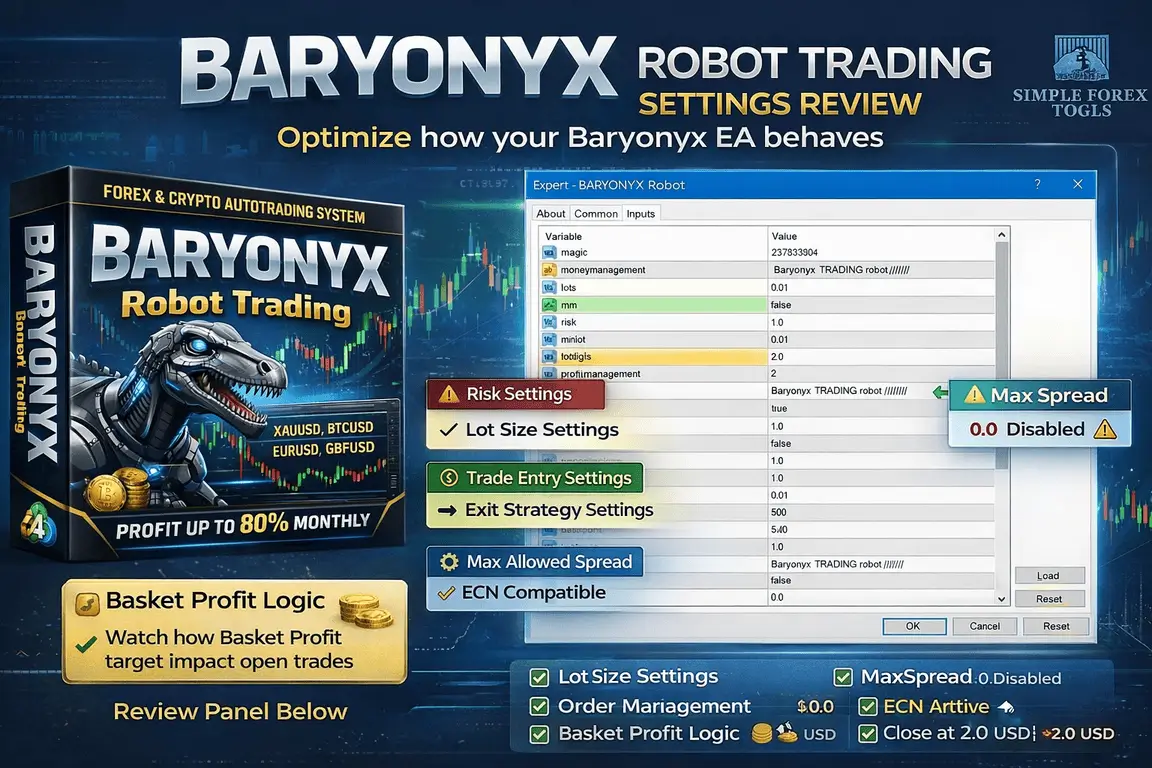
Baryonyx Robot Trading MT4 Setting Panel
The visible input panel gives a useful look into how this EA is structured. It shows a mix of money management, profit logic, order handling, and protection-related fields. Some settings are active, some are disabled, and some are set to zero, which usually means the EA may rely on internal logic rather than fixed external parameters.
Below is a practical breakdown of the main settings visible in the panel.

>== Baryonyx Robot Trading MT4 Download ==<<
Basic Identification Settings
magic = 237833904
This is the Magic Number used by the EA to identify its own trades.
Why it matters:
-
It helps the robot distinguish its orders from manual trades or other EAs.
-
It is especially important if you run more than one bot on the same MT4 account.
-
If you attach Baryonyx to multiple charts or symbols, you may want different magic numbers to avoid trade management conflicts.
Practical tip:
If you use only one copy of the EA on one chart, this value can usually stay as it is. But if you run multiple strategies, use a unique magic number per setup.
Money Management Settings
This is one of the most important parts of the whole panel.
lots = 0.01
This is the fixed starting lot size.
At 0.01, the EA is starting at the smallest common lot size for many MT4 brokers. For cautious traders, this is usually a safer place to begin, especially on a demo account or a small live account.
mm = false
This strongly suggests that automatic money management is turned off.
In simple terms:
-
When mm = false, the robot is likely using the fixed lot size set in the lots field.
-
It is not automatically scaling position size based on account balance or equity.
That makes the setup more predictable for beginners, because your lot size stays fixed instead of changing dynamically.
risk = 1.0
This setting is visible even though money management is disabled.
That usually means:
-
The EA includes a risk-based sizing feature,
-
but it will only matter when mm = true.
A risk value of 1.0 often represents a low or moderate risk profile, depending on how the developer designed the formula. But in the current visible setup, since mm is false, the risk field may not actively affect trading unless money management is turned on.
minlot = 0.01
This sets the minimum lot limit.
It prevents the EA from trying to place a position smaller than the broker allows.
maxlot = 1.0
This sets the maximum lot cap.
That is an important safety limit. Even if money management is enabled later, this cap may stop the EA from opening oversized positions above 1.0 lot.
lotdigits = 2
This tells the EA how to format lot sizes with two decimal places.
That is standard for many MT4 brokers and helps ensure correct order sizing.
📌 What these money management values really tell us
The current visible setup looks more like a controlled fixed-lot configuration than an aggressive compounding setup.
That can be a good sign for traders who want:
-
-
easier testing
-
consistent position sizes
-
lower complexity
-
more controlled early-stage evaluation
-
Beginner takeaway:
The first settings you should pay attention to are lots, mm, risk, and maxlot. These settings shape the account risk more than almost anything else on the panel.
Profit Management Settings
basketdollars = true
This is one of the more interesting settings in the panel.
It suggests the EA may use a basket-based profit target in dollar terms, rather than only looking at individual trade targets. In many EAs, “basket” means the robot can manage multiple positions as one combined group.
dollars = 2.0
If basketdollars = true, then 2.0 likely means the robot may close a basket of trades when total profit reaches $2.
This is a small target, which may imply one of two things:
-
the bot is designed to take small, frequent profits, or
-
this is simply a conservative visible example used for testing or lower-risk operation.
📌 What this means in practice
A basket dollar target can behave very differently from a classic fixed take-profit setting.
It may:
-
-
close trades earlier as a group
-
reduce time in the market
-
favor quick exits
-
affect how long drawdown is allowed to remain open
-
For some traders, this can feel safer. For others, it can create a pattern of small wins with occasional larger floating pressure, depending on how the entry logic works.
Because the screenshot also shows takeprofit = 0.0, this basket-based profit control may be a major part of the EA’s exit style.
Important point:
If a robot relies on basket profit logic, then account size, lot size, and number of trades all become even more important. A $2 basket target means something very different on a micro setup versus a larger account.
Order and Trade Entry Settings
ecn = false
This setting usually relates to how orders are sent on ECN brokers.
When ecn = false, the EA is likely not using ECN-specific order handling in the visible setup. Some brokers require different execution methods, especially when stop-loss and take-profit cannot be placed at the same time as the market order.
Practical note:
If your broker is true ECN and you see order errors, this is one of the first settings to check.
oppositeclose = false
This likely means the EA will not automatically close an existing trade when an opposite signal appears.
That can matter a lot. If disabled, the robot may allow positions to stay open according to its own logic rather than flipping immediately on a reverse signal.
reversesignals = false
This suggests the EA is not in reverse mode.
Some traders use reverse mode when they believe the original signal logic performs better in the opposite direction. Here, reverse trading is clearly turned off.
maxtrades = 500
This is a very large number. It does not necessarily mean the EA will open 500 trades in normal conditions. More likely, it is just a very high ceiling.
Still, from a risk perspective, this deserves attention.
A high max trades limit means:
-
the EA is not tightly restricted by this field
-
other logic is probably controlling actual entries
-
traders should not assume the robot is “safe” just because fixed lots are small
tradesperbar = 1
This is a very useful control.
It means the EA can place only one trade per candle/bar. That can help reduce overtrading and repeated entries during noisy price action.
For many traders, this is a strong safety feature because it prevents the robot from firing too many orders within the same bar.
onetimecalculation = true
This likely means the EA calculates some conditions once, rather than constantly recalculating every tick in the same way.
That can reduce unnecessary signal noise and may support more stable entry logic.
enteronopenbar = true
This is an important clue.
It suggests the robot is designed to enter trades at the open of a new bar, rather than entering randomly during candle formation.
That often has benefits:
-
cleaner signals
-
less intrabar noise
-
easier backtesting consistency
-
fewer sudden entries caused by temporary price spikes
For beginners, this is usually easier to manage and understand.
📌 What these entry settings tell us
The visible panel points to an EA that may prefer structured, rule-based entries rather than hyperactive tick-by-tick trading. Settings like tradesperbar = 1 and enteronopenbar = true often support a cleaner execution style.
That does not make it automatically safe, but it does suggest the bot is not simply firing orders in a random high-frequency way.
Stop, Target, and Exit Behavior
This section is one of the most important in the whole panel.
hidesl = false
The stop-loss is not hidden.
If the EA uses a stop-loss, this suggests it would be visible to the broker rather than managed secretly in the background.
hidetp = false
The take-profit is also not hidden.
Again, that means broker-visible levels would be used if active.
stoploss = 0.0
takeprofit = 0.0
These zero values are significant.
They usually suggest one of the following:
-
no fixed stop-loss or take-profit is being used from these fields, or
-
the EA manages exits using internal strategy logic, basket profit logic, or other dynamic controls
Given that basketdollars = true, it is reasonable to think the robot may not rely heavily on fixed TP in the traditional way.
But this also means traders should be cautious. When a robot does not use a standard hard stop or standard hard take-profit from visible inputs, the real risk behavior may depend heavily on the internal strategy logic.
trailingstart = 0.0
trailingstop = 0.0
These appear disabled in the current visible setup.
That means classic trailing stop behavior is probably not active.
trailingstep = 1.0
This value is visible, but if trailing is not active because start/stop values are zero, it may not currently play a major role.
breakevengain = 0.0
breakeven = 0.0
These also look disabled.
That means the EA is probably not moving trades to breakeven in the current configuration.
📌 What this means for traders
This visible exit setup looks minimalist, with many classic protection tools effectively turned off or set to neutral values. That does not automatically mean the robot is dangerous, because some EAs manage exits internally. But it does mean you should not assume there is strong external protection unless you have verified how the strategy closes trades.
This is where many traders make mistakes.
They see fixed lot size and think the setup is safe, while ignoring the fact that stop-loss, trailing, and breakeven fields are not actively protecting trades in the visible configuration.
Spread and Safety Controls
maxspread = 0.0
This is another setting worth discussing carefully.
Usually, maxspread is used to prevent the EA from opening trades when spread is too high. But when set to 0.0, it often means one of these two things:
-
spread filtering is disabled
-
or the EA interprets zero as “no limit”
If that is the case, the robot may still open trades during poor spread conditions unless it has separate internal filters.
That can matter a lot during:
-
market open
-
news events
-
rollover
-
illiquid sessions
Practical advice:
If you are trading with a broker that has unstable spread, this is one setting worth reviewing before going live.
Recommended Setup Reading of the Current Panel
Looking at the full visible configuration together, the current setup appears to lean toward this style:
-
Fixed lot trading
-
Money management disabled
-
Small starting size
-
Basket-style dollar profit handling
-
One trade per bar
-
Entry on bar open
-
Classic SL/TP and trailing tools not actively used
-
Wide or inactive trade count/spread limits
That is neither automatically conservative nor automatically aggressive. It is better described as simple on the surface but highly dependent on the EA’s internal trade logic.
Which Settings Are Safer and Which Are More Aggressive?
📌 Safer-looking settings in the visible setup
-
lots = 0.01
-
mm = false
-
tradesperbar = 1
-
enteronopenbar = true
-
minlot = 0.01
-
maxlot = 1.0
These settings suggest more controlled position sizing and a less chaotic entry pattern.
📌 More aggressive or risk-sensitive areas
-
maxtrades = 500
-
stoploss = 0.0
-
takeprofit = 0.0
-
breakeven = 0.0
-
trailingstop = 0.0
-
maxspread = 0.0
These do not necessarily make the EA aggressive by themselves, but they do mean risk control may rely heavily on internal logic rather than visible hard limits.
Common Mistakes Traders Make With This Type of Settings Panel
1. Turning on money management too early
Many traders see a risk field and immediately assume dynamic lot sizing will improve profits. But enabling money management before you understand the strategy can make losses grow faster too.
2. Ignoring exit logic
If stop-loss, take-profit, breakeven, and trailing are set to zero, do not assume the EA is protected. You need to understand how it exits trades in real market conditions.
3. Using a live account before testing basket behavior
A basket dollar close sounds simple, but its real behavior depends on how the bot opens and groups trades. Always test it.
4. Running the EA on a weak broker setup
With ecn = false and maxspread = 0.0, broker conditions matter more. Bad execution can distort results.
5. Treating small lots as a complete safety plan
A 0.01 lot start helps, but safety is never just about the first lot size. It is about the full system: entries, exits, spread, number of positions, and floating exposure.
How Beginners Should Approach Baryonyx Robot Trading MT4 Settings
If you are new, do not try to optimize everything on day one.
Focus first on these settings:
1. Lot size – Keep lots = 0.01 unless your account is large and already tested.
2. Money management – Leave mm = false until you clearly understand how the robot behaves.
3. Trade frequency – Check tradesperbar and observe how often the EA actually enters.
4. Exit behavior – Watch how trades are closed since visible SL/TP values are zero.
5. Spread conditions – Pay attention during volatile sessions because maxspread = 0.0 may not protect you.
This kind of slow approach helps beginners avoid the classic mistake of using a real account as a test environment.
Recommended Practical Setup Conditions
Even without forcing random unsupported settings, there are a few practical usage rules that make sense for this EA type.
📌 Use a demo account first
This is essential. You need to watch:
-
-
how many trades it opens
-
how long positions stay open
-
whether trades are grouped
-
how the basket close behaves
-
how floating drawdown develops
-
📌 Use a reliable broker
Because execution style matters, choose a broker with:
-
-
stable spreads
-
low slippage
-
strong MT4 execution
-
support for your account type
-
📌 Use a VPS
A VPS is highly recommended for any EA that relies on trade management logic. It keeps the platform online and reduces interruptions.
📌 Avoid major news until behavior is understood
Since spread protection is not clearly active in the visible setup, it is smarter to observe performance around volatile periods before trusting it live.
Baryonyx Robot Trading MT4 Review

>== Baryonyx Robot Trading MT4 Free Download ==<<
Who Is This Bot More Suitable For?
Based on the settings panel, Baryonyx Robot Trading MT4 looks more suitable for traders who want to:
-
study and test settings rather than blindly install
-
use fixed lot trading first
-
monitor actual trade behavior closely
-
evaluate internal exit logic carefully
-
build confidence through demo forward testing
It is less suitable for traders who want a robot that feels “set and forget” from the first day.
That is not a weakness. In many cases, the traders who get the best long-term results are the ones who treat the EA like a tool, not magic.
Final Verdict
Baryonyx Robot Trading MT4 has a settings panel that looks straightforward at first, but it deserves more respect than that. The visible inputs show a robot that can be kept simple with 0.01 fixed lots and money management off, yet the real behavior likely depends heavily on its internal trade and exit logic.
That is why this is not the kind of EA you should judge only by screenshots, backtest headlines, or seller claims. The important part is how the settings work together:
-
fixed lot vs dynamic risk
-
basket profit handling
-
one trade per bar
-
entry at bar open
-
no visible active SL/TP or trailing protection
-
possible lack of spread limitation
For a beginner, the smartest path is to keep the setup small, slow, and controlled. For an experienced trader, the interesting part is not the default look of the panel, but how carefully it can be tuned and monitored.
If you plan to use Baryonyx Robot Trading MT4, review the settings carefully, test it on demo first, and only move live after you understand how the robot enters, manages, and exits real trades.
And if you want ongoing setup ideas, optimization discussions, and free trading tool updates, it is worth checking the product page and joining the Telegram channel for future setting tweaks and practical trading discussions.
Frequently Asked Questions(FAQs)
1. What is the best setting for Baryonyx Robot Trading MT4?
There is no single best setting for every trader. A cautious starting point is usually fixed lot size at 0.01, with money management turned off until you understand the EA’s trade behavior.
2. How do I use Baryonyx Robot Trading MT4 settings correctly?
Start by understanding the core fields: lots, mm, risk, basketdollars, maxtrades, tradesperbar, and exit settings. Test the robot on demo first and observe how it handles entries and closes trades.
3. Is Baryonyx Robot Trading MT4 good for beginners?
It can be beginner-friendly if used carefully, especially with small fixed lots. But beginners should not ignore the fact that some visible protection settings like stop-loss and take-profit are set to 0.0 in the shown setup.
4. Can I use Baryonyx Robot Trading MT4 on a small account?
It may be possible if you keep the setup conservative and use 0.01 lots, but the real answer depends on broker conditions, leverage, and how the EA handles floating drawdown.
5. Are default settings safe for Baryonyx Robot Trading MT4?
Default-looking settings are not automatically safe. Even when lot size is small, safety also depends on exit logic, spread control, and number of open trades.
6. Do I need a VPS for Baryonyx Robot Trading MT4?
Yes, a VPS is strongly recommended. It helps keep MT4 online continuously and is especially useful for robots that rely on ongoing trade management.
7. How do I reduce drawdown with Baryonyx Robot Trading MT4?
The most practical ways are to use smaller lot sizes, avoid enabling money management too early, monitor basket behavior, use good broker conditions, and test during live market sessions before increasing risk.
Best EAs Setting Review
-
Eyes Storm MT5 EA Setting Review 2026 | Free Download Now
-
Gold BO ATR EA MT5 Setting Review 2026 | Free Download Now
-
Golden Mirage MT4 Setting Review 2026 | Free Download Now
Best Alternatives
-
Gann Gold EA MT4 | Download Now
-
Local Trade Copier MT4 MT5 | Download Now
-
Blazzers Hacked EA MT4 With SetFile | Download Now

Eyes Storm MT5 EA Setting Review 2026
Gold BO ATR EA MT5 Setting Review 2026
Golden Mirage MT4 Setting Review 2026 - Best Setup & Optimization Guide
